Welcome to filtsai.com! | Home | Contact | Register | Login
Christ | Cars | Woodworking | Condo | Nutrition | Wifetest | Pictures | Japan
Cooking: savory | sweet | techniques | uncategorized | all recipes
 Header Installation

    click for a larger image
Next we need to remove the secondary pipe.

First thing we need to do is separate it from the catalytic converter. It is attached by three bolts.
 

Here's a better picture of the catalytic converter from the opposite side. You can see the secondary O2 sensor which your car's computer looks at to see how the engine is functioning. It measures the O2, gas, water and pollutant levels running through your cat. It also compares the results from the first O2 sensor to determine if the catalytic converter is functioning correctly.  

As I mentioned before, the cat bolts were rusted beyond recognition. My wrench set could not get a grip on the nuts so I had to cut the bolts off with a Dremel. When working under a car with parts, wear adequate eye protection and a breathing mask since debris could fall, especially when working on things in this condition.

Here you can see the bottom two bolts have been cut short and the nuts cut off. The top bolt has been cut and the nut is half-cut. It was a pretty nasty job and I spent hours under my car doing this. These bolts are STRONG.
 

To the right you'll see two of the nuts and all the way to the right part of the bolt that I cut off. I got one nut off (left) pretty much intact, but another nut I ended up cutting into little bits before I got it off.

Then, I learned that the bolts are soldered to the cat and after all my work, I had no way of attaching the new secondary pipe! Luckily one bolt was still mostly in tact and another was half-intact so I could re-use them until I went to CarX to have them professionally removed and replaced. I highly recommend you go to CarX BEFORE starting so that you'll have a much better time with the installation.
 

When the cat bolts are off, locate the secondary support bracket. It should be located just in front of the flex joint. Spray these bolts liberally with WD-40 and they should come off without much of a problem.  

Directly behind the flex joint is where the rubber hanger for the secondary pipe is. Spray this liberally with WD-40 and you should be able to pull the support peg from the stock secondary out.

Now that the stock secondary pipe is off the car and you can toss it in your scrap heap along with your other parts.
 

Take your new secondary pipe and put the metal ring gaskets into place. The two smaller rings go in the top two pipes that attach to the header while the third larger ring fits in between the secondary pipe and the cat.

Stick the support peg for the new pipe into the rubber hanger, then attach it to the support bracket with the existing nuts. Connect the end of the secondary to the cat using three new bolts (or the ones CarX put in for you), making sure that the metal gaskets stay in place.
 

Connect the new secondary pipe to the header with the three bolts provided in the kit. Tighten in an alternating pattern until you reach the appropriate torque.

Lastly, use the wire harness extension that came with your kit to attach the original O2 sensor plug with the O2 sensor that is now located on the secondary pipe. I routed the new harness back along where the original plug came from, then to the left and a little behind the engine down to the new location of the O2 sensor. I then used the supplied zip-ties to secure the harness at various points.


Now go through and check all your work and make sure all the bots are on correctly. If all seems good, re-connect your battery, fire up your car and let it idle for 5 minutes while the computer takes new readings. After that you should be set to go! You may wish to take it easy for a few days while all the WD-40 burns off (it'll smell funny) and the pipes get broken in but I don't think there's an official break-in requirement.

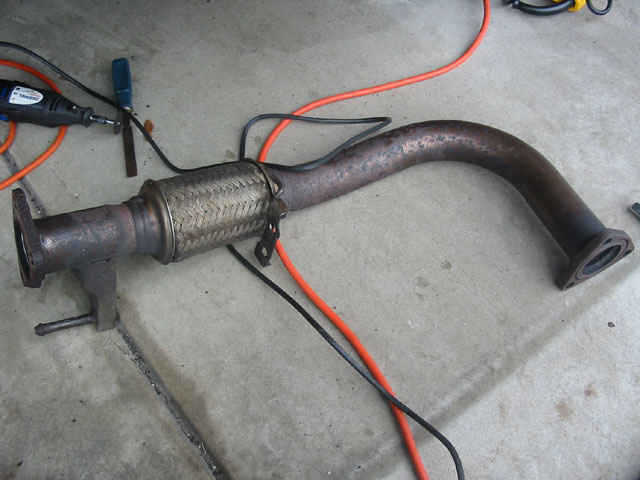
I didn't feel much of a difference in sound or performance after this mod but I wasn't pushing my car very hard either since I was using temporary bolts and nuts to hold the secondary pipe and cat together. After CarX replaced them, I got my exhaust installed pretty quickly so I can't properly review this mod on it's own. Check out my thoughts after my exhaust intallation.


Introduction | Installation | Installation 2    


Copyright © 1999-2024 filtsai.com